
What is the “Shutter & ISO Priority” all about?
The SI mode in ProCamera builds a bridge between the automatic mode and full manual. In doing so, it combines the advantages of both technologies: You get the speed of the automatic mode and the control of the manual mode. That is why this feature is so popular on big DSLR cameras, and it’s also the reason why we have received so many requests for it all along.
There are situations where you want to deviate from the values the automatic mode gives you. This doesn’t mean that there is anything wrong with those values. The automatic mode does exactly what it’s supposed to – but it just can’t read your mind.
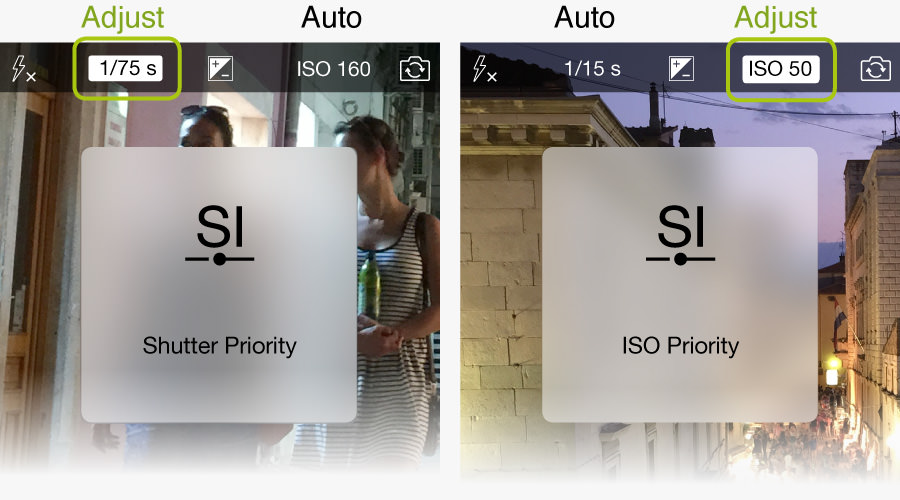
In SI mode you may then adjust the shutter speed according to the situation or your artistic vision – and ProCamera will automatically calculate the appropriate ISO value for the best possible exposure. It also works vice versa: You adjust the ISO value, and ProCamera finds the right shutter speed. The difference between semiautomatic and manual mode is, that in full manual you have to adjust both values manually in order to get the same overall level of exposure.
Why would I want to adjust the Shutter Speed or the ISO Value?
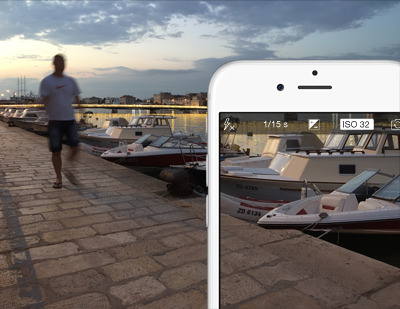
This primarily depends on your motif. In case you want to capture something that is moving relatively fast (cyclist, driving car, flying bird, pedestrian, etc.), you may want to dial in a faster shutter speed to freeze the motion. Then, in order to get the same exposure, the ISO value needs to be raised, so that the sensor is more sensitive to light. Higher ISO values compensate for a shorter exposure duration.
The higher the ISO value is, the more noise is introduced into the photo. Therefore you may want to do the opposite in some cases: Lower the ISO value, which leads to a longer exposure time and less noise. This is not always advisable, because you may no longer be able to freeze the motion of a moving subject, or you may no longer be able to shoot handheld, due to the long exposure time.
The important thing about it is, that there is no right or wrong. These are all legitimate settings. It’s all about the motif and your vision: Do you want to capture fast movements without motion blur – or do you want less grain in your photo? You decide what the photo should look like – and ProCamera provides you with the tools for that.
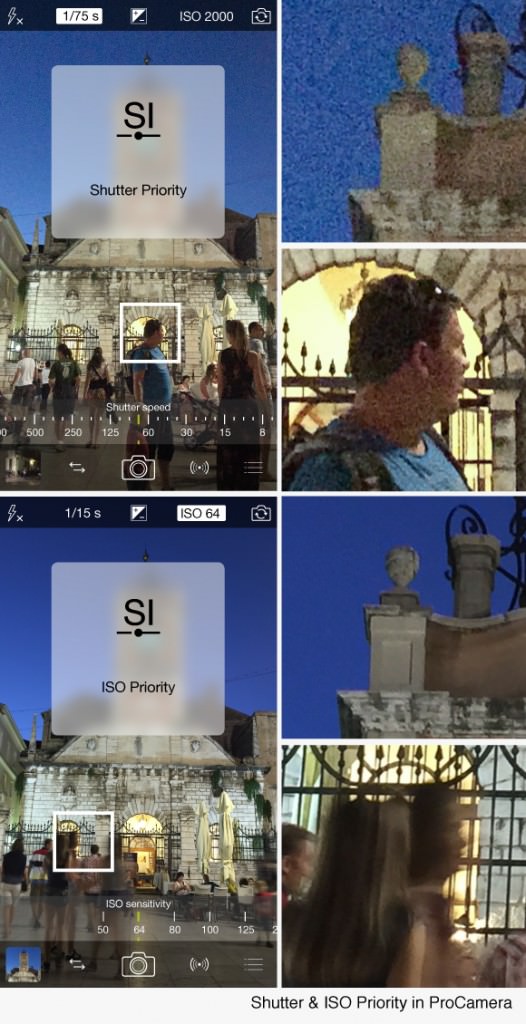
Alongside, you can see two photographs plus magnifications of the same scene. The upper one was taken in Shutter Priority, aiming for a relatively short exposure time to freeze the motion of the pedestrians. As it was long after sunset and therefore pretty dark, the ISO value was automatically raised to ISO 2000.
The second photo was taken in ISO Priority, aiming for as little noise as possible. To achieve this, the ISO value was manually lowered to ISO 64, which resulted in an extended exposure time. As you will notice, at a shutter speed of 1/15 seconds, the movement of the pedestrians causes a lot of motion blur.
Understanding Shutter Speed and ISO Sensitivity
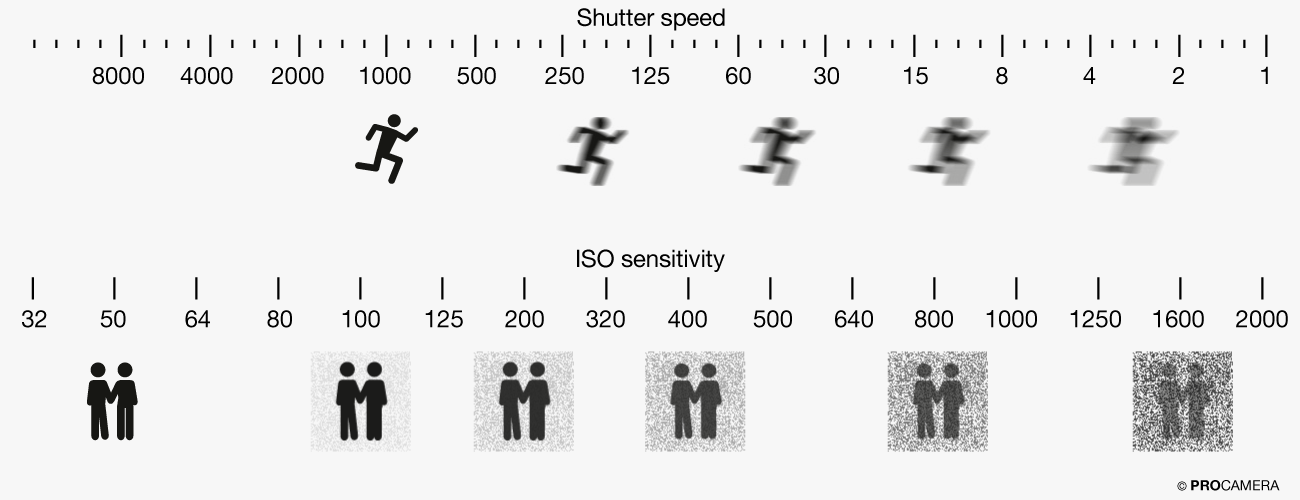
The graphic below shows you how changing the Shutter Speed and/or ISO-Value will affect your final photograph:
How do I use SI Mode in ProCamera?
1. Entering SI Mode:
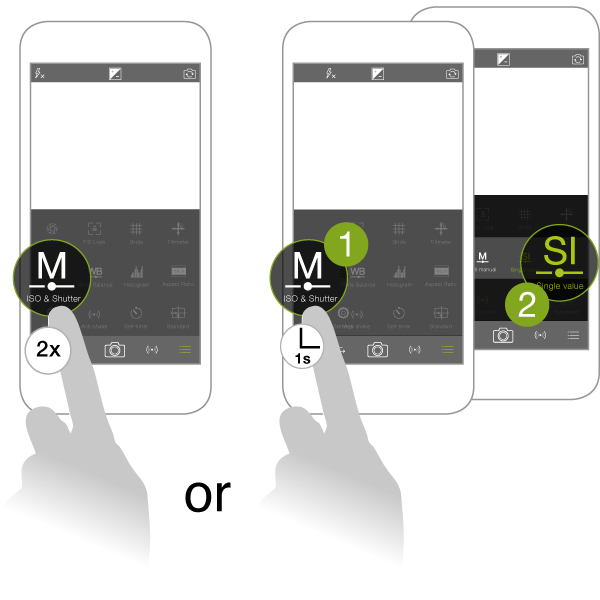
To enter SI mode, open the Control Panel and tap twice on the „M ISO & Shutter“. This leads you from automatic mode („M“ icon is colored in white), to manual mode (icon is colored in green), to SI mode (SI icon).
An alternative way to start the SI mode is long-pressing the „M ISO & Shutter” icon until a submenu appears.
2. Using the Exposure Circle and/or EV Slider:
This step is optional. In case the preview in your viewfinder looks right to you, you can either take your photo right away or go to step 3 to manually adjust the pair of values.
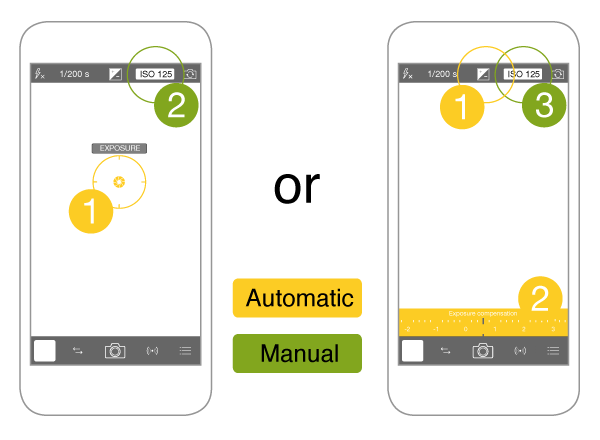
When you enter SI Mode, you start with an auto calculated pair of values. If you want to adjust the brightness level of your photo (make it brighter/darker), you can use the Exposure Circle. Simply drag it to an area in the viewfinder, where you want the automatic to base their calculation on.
Another way to make changes to the pair of values, is to use the EV Slider ( “+/-” icon on top of the screen). With a simple swipe, you can brighten or darken your photograph.
To change the overall brightness of your photo, you can either use the Exposure Circle or the EV Slider. Both will give you an new pair of auto-calculated values, based on your brightness adjustments. The difference between the two is, that with the EV slider the relative adjustment (darker/brighter) will be maintained, even when manually altering exposure time or ISO value in Step 3.
Pro Tip
It also works the other way around: You have manually adjusted the Shutter Speed and/or ISO value (Step 3) and realize it’s not what you had in mind. To quickly go back to auto-calculated values – even if they are just a new starting point for further adjustments – simply move the exposure reticle or the EV slider.
3. Adjusting the Shutter Speed or ISO Value:
When you are in SI mode, you can tap on the shutter speed or ISO value at the top of the screen to adjust the corresponding value. When doing so, you will notice that changing one of those values manually results in an automatic adjustment of the second value. That’s why it’s called semi-automatic mode.
As far as technically possible, the SI mode will ensure a consistent brightness level when changing a value. A photo taken at ISO 32 and an exposure time of 1/50s is just as bright as a photo taken at ISO 64 and an exposure time of 1/100s.
The automatic calculation of the second value is based on the area where your Exposure Circle is located. If you haven’t moved the Exposure Circle, the reading will be based on a large area in the center of the image.
You have the choice:
If you are a total Pro, you might find the camera is encroaching on your field of expertise, when using the exposure circle/EV Dial, resp. getting auto-calculated values in SI Mode. If this is the case, simply switch off the exposure circle and hide the EV dial (or just don’t touch them). However, we invite every Pro to give the simple “SI Mode” with the Exposure Circle a try before going into the world of DSLR control.
Everyone has their own preferred style of shooting. Therefore ProCamera offers three ways to operate: Completely intuitive with focus and exposure reticles, completely manual with a DSLR style control and third, the best of both worlds: completely intuitive plus manual control when needed.
As this is a brand new feature and we received so many requests on it, we are very interested in user feedback.


I love the shutter and ISO manual options, but why isn’t it available in video mode?
Having that kind of control in video mode would probably make me switch from the other “pro” app I currently use 🙂
Hello Ike,
thank you very much for your feedback. We’re delighted to hear you enjoy using our app.
Thank you for your feature request of manual ISO and shutter controls in video mode. However, we cannot make a promise that this feature can be put into practice. Adjusting ISO in particular is tricky, respectively impossible, when trying to maintain a constant framerate.
The exposure duration is reciprocal to the framerate. So if you set a constant ISO value, you would get inconsistent brightness of the video – if you want a constant framerate. To avoid that, the framerate would need to be variable which would look odd.
Who is “Manuell?” Your illustrations in Step 3 show Auto and Manuell. 🙂
Hi Mark,
don’t you know Manuell? 😀
Jokes aside, “manuell” is the german word for “manual”, somehow the German slide must have slipped in…
Thanks for pointing that out, we don’t want any confusion here!
If I understand correctly, the Manual and SI modes don’t work (can’t set ISO or shutter speed specifically) in the dual lens mode for iPhone 7, is this something that might be implemented in the near future?
Thanks!
Hi Celina,
you are right. The manual controls (ISO, shutter speed) don’t work in conjunction with the Dual lens camera mode of the iPhone 7 Plus.
To use manual controls, please switch to the individual wide or tele lens.
HI,
I use iPhone 6 plus and I have bought Procamera App in order to use the manual adjustment on Shutter (SI mode). However, after the app is installed I could not find this function in the software. I have followed your instructions many times but still could not find it. I feel so frustrated as I was expecting it would work. Does this SI function only work with iPhone 7? Thanks.
Just add to my last post, I purchase Procamera 10 and its in-app purchase HDR and Low light+, but it seems neither of these can use SI function. Very sad.
In general, the full manual mode (or the semi-automatic SI mode = Shutter/ISO Priority) is activated in the Control Panel. Tap the icon with the three lines bottom right and tap the “M” icon (green = Manual Mode is active). Here, you can also activate the semi-automatic “SI” mode.
Manuel mode (settings exposure time + ISO value) is not active in HDR and LowLight Plus mode, since both modes utilizes a multi-frame capture process. This means the camera automatically captures more than one single photo and combines them for a superior result.
is it possible to save / store my favourite SI settings? I usually have my DSLR set to 1/200 and ISO to 200, which gives me a quick starting point for street photography. I also set my ev to -1 (I like to underexpose a little, which I can always adjust in post processing if needed).
Hi Sybille, Thanks for the feedback. Currently, there is no option to save custom camera settings like you described in your comment.
But your input will be forwarded to the developers and taken into consideration for future updates. Enjoy ProCamera.
hello,it is possible to change the aperture?
Thanks for your interest in ProCamera. The iPhone has a fixed aperture, so there is no option to dial in a bigger/smaller aperture.
However, shutter speed and ISO value can be adjusted in Manual mode.