Raw capture and editing opens up a whole new area for iPhone photography. Having access to the raw sensor data allows for even more creative freedom in post-processing.
Based on the feedback in the last couple of days, it seems like you are just as excited about the new possibilities of RAW as we are. In this post, we want to outline the current status of RAW in iOS/ProCamera:

- We are happy to introduce RAW capture and editing on all devices with a 12 MP camera. That’s the iPhone 6s, iPhone 6s Plus, iPhone SE, iPhone 7, and iPhone 7 Plus. The front-facing camera is not supported.
- RAW photos are saved in the DNG file format (lossless compression) and are about 10-12 MB in size.
- Currently, a separate JPEG file is always saved along with the RAW photo (.DNG).
- In the iOS Photos app and the ProCamera albums, RAW photos are displayed in preview size/quality. The actual RAW file holds the full 12 MP data – even though some EXIF-viewers only display the pixel resolution of the small embedded preview JPEG.
- Since RAW files always make use of the full sensor (4:3), zoom is disabled and deviating capture formats like 16:9 or 1:1 only affect the appendant JPEG file.
- RAW files contain the unprocessed sensor data. When any kind of image processing happens in the background, where the data from the sensor is being interpreted/altered, it makes no sense to convert the file back into some kind of RAW file format afterwards. Unprocessed sensor data and automatic image processing contradict each other. This affects the HDR and LowLight Plus camera modes, as well as the iOS image stabilization:
– When shooting RAW photos, no iOS image stabilization and processing is applied. You get the unaltered sensor data. When shooting handheld in low light situations, you might get better results with the JPEG/TIFF file format, due to the internal stabilization/optimization. Automatic Image Stabilization (software) and Optical Image Stabilization (hardware) work hand in hand on devices capable of both. You can’t have one without the other.
Our Anti-Shake feature, which delays the capture until the device is held steady, works with the RAW file format. Its mechanism helps you get sharp photos by avoiding camera shake.
– When switching to HDR or LowLight Plus camera mode, where RAW capture is not supported, the file format will automatically switch to JPEG. If you have selected RAW files in settings, the app will automatically switch back to RAW capture, once you enter a camera mode that supports this file type.
How To Switch The File Fomat
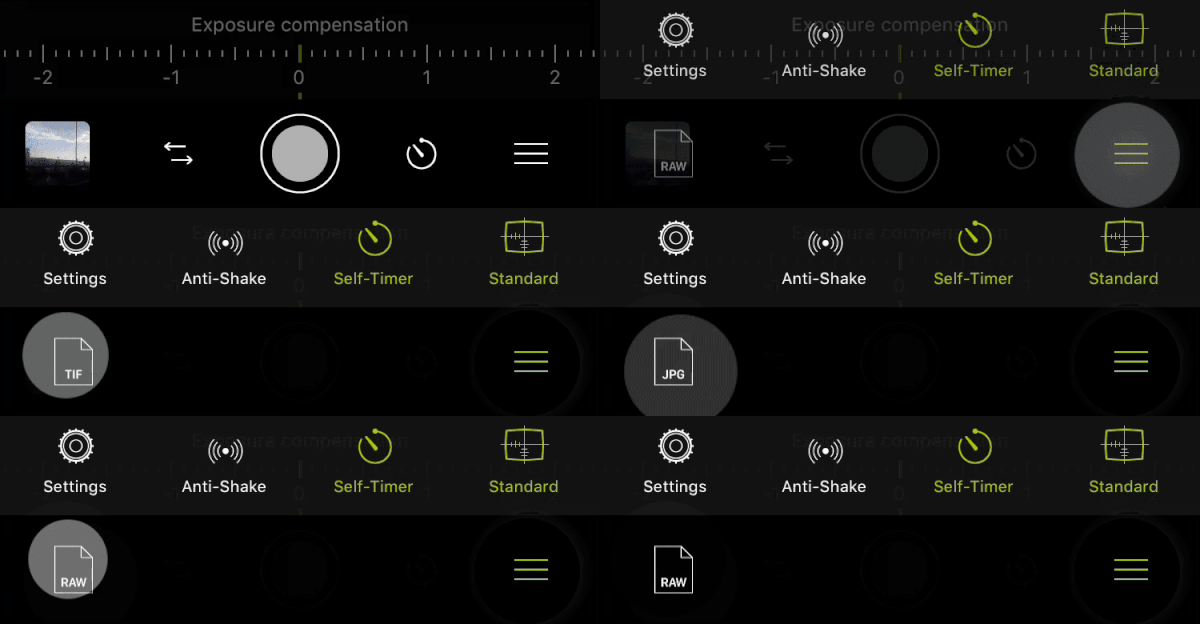
In ProCamera v10.0, we have introduced an additional way to check and/or change the file format.
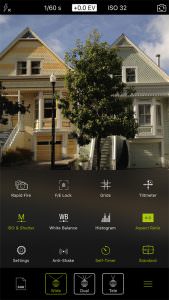
Traditional way: Open Control Panel (three lines icon, bottom right) > Settings > Photo Mode Options: File format.
New way: Open the Control Panel. In the bottom left corner, the present file format is displayed. It’s also handy for checking if you are currently shooting RAW photos – or if RAW capture is supported in the current camera configuration in the first place.
Tap the file format to toggle between all available file format options on your device/in this camera configuration (camera mode, active lens)
Editing Raw Files
The Editing Suite of ProCamera now also supports RAW files on all devices capable of shooting RAW photos. Once again, this means iPhone 6s, 6s Plus, SE, 7, and 7 Plus.
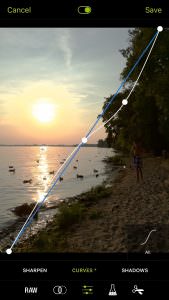
When editing, RAW files (.DNG) remain untouched. Edited versions of the capture will be saved as a new JPEG files. You will notice that the RAW editing in ProCamera includes brand new adjustment tools in an additional fifth section called “RAW” (icon bottom left). Of course, you can also utilize the regular ProCamera editing tools for your RAW files – or send the RAW file to Photoshop CC on your desktop computer.
How To: Open a RAW photo in the ProCamera gallery and tap “Edit”. In the ProCamera albums, RAW files have a visible “RAW” marking.
Special Characteristics of the iPhone 7 Plus
The iPhone 7 Plus is the first iOS device with a dual camera system. Therefore, this device has some unique characteristics and settings.
With two simple taps, you can quickly switch between the Wide, the Tele, and the Dual lens mode of the iPhone 7 Plus. You will also feel the lens switch with haptic feedback.
Since the Dual lens camera mode automatically merges the data of the two lenses/sensors, RAW capture is only available with either the Wide or the Tele lens – not the Dual lens mode. In Dual lens mode, manual settings are inoperative, but it noticeably increases the image quality of zoomed-in shots.


If we can’t use HDR with RAW would it make sense to add a feature that would shoot bracketed images so that they could be processed with HDR?
Would you want the bracketed images to be processed inside the app or on your desktop computer?
Thumbs up for your HDR Mode on the 7 Plus. Nice update!
It would be really amazing to get the feature with bracketed images for download to process HDR on the desktop computer, cause there are also a lot of nice features to play around with it..
So you can understand this definitely as a feature request : ) It would be nice to get bracket-series with 3, 5 and 7 shots, if this is possible on an iPhone..
Thank you and best regards
Certainly the best camera app for the best camera on a smartphone. A great marriage, iPhone 7+ and ProCamera. Looking forward to seeing the benefits of vivid HDR soon.
Thanks, Terrry! We certainly do like the combination, too. We will release an update once vividHDR is available for the new iPhone 7 and iPhone 7 Plus.
I love this app! The only thing is that since I can’t shoot RAW with the low light plus mode, I would recommend putting a lot longer exposures in the low light mode. Up to 30 seconds or so. Or maybe even have a bulb mode for long exposures! Also, I would suggest manual controls for all modes like hdr and low light plus. Other than that, the app is great!
We are happy to hear you love ProCamera. We understand your wish for longer exposure times in standard Low Light mode. In this mode we are limited by what iOS provides. All new iPhones (iPhone 6s and newer) have a limit of 1/3s. The iPhone 5 still offers the longest exposure duration per capture: 1 second. Our special Low Light Plus mode combines multiple images (up to 64) into one image and can therefore offer exposure times beyond the limits. These images are processed; therefore we can not offer RAW format in this special mode as RAW images per definition store unprocessed sensor data.
Both vividHDR and LowLight Plus offer a very intelligent two-step scene analysis. It would require minutes and a lot of trial and error per photo to manually set the perfect exposure values for both special modes. The scene analysis makes decisions about ISO and exposure time, trying to keep ISO down if possible. When the device is mounted on a tripod, the exposure times are automatically prolonged. The scene analysis takes many aspects into consideration and computes the perfect exposure values for the given situation and lighting condition in less than a second.
In LowLight Plus LUX+ (long exposure mode), we offer the ability to change the exposure level even after the capture. This way the photographer can focus on the subject and the optimal composition, rather than having to fiddle around with lots of settings.
Your wish for a bulb mode is noted.
Just discovered your Procamera and I’m seriously loving the heck out of it. Will come right next to my first favourite shooting app which is Cortex cam. Cortex cam uses median blending, much like your 64 Low Light plus mode to remove noise and incidental aberrations between shots. I never shoot moving subjects so median blending is perfect for my needs.
My question is this: Would it be possible to extend the 64 low light shots to higher numbers? Also, multiple blending on RAW shots is absolutely stunningly perfect. Although more shots are necessary to compensate the markedly noisier outcome, leaving out the accumulation of JPEG artifacts when median blending will contribute so much to image sharpness and retaining actual data from the sensor, it’s a perfect marriage. Would you be interested in considering this?
Other than that, for Procamera to be the perfect night shooting camera, it would have focus peaking and zoomed in focusing (DMF in Sony jargon). When you focus, a draggable square comes out that shows you zoomed in, what you are focusing exactly.
Great app, viel dank!
Please provide detailed instructions on how to export DNG files to a computer.
Your ProCamera RAW photos just need to be saved in Camera Roll.
That is, in case you use ProCamera’s Lightbox, make sure you export them from there to Camera Roll.
The easiest way is to use Image Capture on the Mac to import your photos.
When using Photos on the Mac, if you drag and drop a photo out of Photos App on the Mac, it is exported as JPG.
To avoid that, in the Photos App, use File > Export > Export Unmodified Original .
The Photos App on the Mac does not indicate if a photo is in RAW.
The only way to find out is clicking the Info button.
To transfer RAW / DNG files to your Windows PC, please connect your iPhone to your computer via Lightning/USB cable. The iPhone should appear in Windows Explorer.
DNG (RAW) files may not be previewed there, since Windows may not provide an automatic preview for RAW. They should be downloaded, however, like standard JPEG or TIFF files. Afterwards, use a program capable of processing DNG to edit.
Did that help?
What is the bit depth of a dng file created with ProCamera?
As far as I know, the current iOS RAW files (.dng) are 10 bit in a 12 bit container.
Just download and installed the app!
Why I’m not getting the option for RAW DNG???
I’m only getting JPEG and TIFF as options, but I bought the app for the RAW capabilities!
How do I fix that???
My phone is an iPhone 6+.
Thank you!
Hi Alex,
We are sorry about the inconvenience and about the time spent searching. As mentioned above, RAW capture and edit is functional on all devices with a 12MP cameras, that is on iPhones 6s, 6s Plus, SE, 7 and 7 Plus. This definition is part of the iOS and beyond our influence.
The iPhone 6 Plus has an 8MP camera.
So I have officially looked everywhere, and tried everything, but for some reason I can’t seem to zoom in when on my normal camera, but I can on my selfie camera. Does anyone know of a setting or something that may not allow me to zoom in? Any help or thoughts would be great!
Hi Eric,
Thanks for getting back to us. Sounds like you are shooting in RAW file format. Since RAW files always make use of the full 4:3 sensor data , zoom is disabled and deviating capture formats like 16:9 or 1:1 only affect the appendant JPEG file. You may switch between available file formats in the Control Panel – the three line icon on the bottom right. Enjoy ProCamera.
Hi, I have just started using the app and ,as you would expect, see a dramatic
difference between the Raw and Jpeg images. I am a Mac user and have no trouble
transferring the images(DNG, etc) from my iPhone to my laptop using image Capture.
When traveling I don’t bring a computer and use a lightning connector flash drive to
backup my iPhone photos and videos with no issues, until I tried backing up the Raw
DNG files, They are not recognized by any of the apps that are used with these flash
drives (also Kingston mobilelite wireless )sometimes a small thumbnail is transferred but
never the full sized DNG. Im planning a long trip and am concerned about maxing out
my iPhone storage. Are you aware of a product, App, etc that will solve this final glitch to
shooting raw while traveling with out a laptop??
Thanks for the detailed description. Unfortunately, we don’t know of any external flash drive that supports RAW files. The RAW files created with ProCamera are standard .DNG files, so any device capable of importing/handling RAW files should be able to work with these photos. An alternative solution for backing up files on the go is using Apple’s iCloud – it also supports RAW files in your library. However, you would need a proper internet connection (not always available when traveling) and eventually a bigger iCloud plan, once you start building a big photo library. Maybe you can find out more about flash drive DNG support when contacting the Kingston support team?
Why dng/raw photos are stored in only 856×600 pixel resolution in camera roll ?
Hello Robert,
don’t worry, the RAW file is always the full 12 MP of your camera. To display a RAW file on your smartphone, there is a small JPEG file embedded in the DNG. Some EXIF/metadata readers only look at the JPEG file and therefore display the pixel dimensions of the small display JPEG.
Starting with the latest version of ProCamera, you can also save RAW+JPEG photos, where two separate files (RAW + a full resolution JPEG) are saved in one asset.
The best way to check pixel dimension is the ProCamera EXIF viewer. Simply go to the gallery, open the photo you want to check, and then tap the little “i” button in the navigation bar at the top of the screen.
Why am I unable to select RAW file format and have it produce a RAW file? I have an iPhone 7+, last eat iOS. The only options I can choose are JPEG, TIFF and HEIC. I am in Photo mode. When Intap Settings, I can then select RAW+JPEG, then when I go back to Settings, Imsee the RAW+JPEG in File Format, but when I take a photo, I only get the JPEG (using the info button) when I am in the Lightbox. There is only one image, and I thought there were supposed to be two, one JPEG and the other RAW. All of is BTW being done in the Lightbox and the app.
Hello Richard,
thanks for the detailed description. I assume you are shooting in Dual lens mode on your iPhone 7 Plus. RAW file format is not available for the dual lens settings (the dual lens processes and merges image data from both lens systems; therefore it is not the pure “raw” sensor data). Switching to the regular WIDE lens should do the trick and enable RAW+JPG shooting.
Kind regards from the ProCamera Team
I want to move all RAW images shot with ProCamera from my iPhone 8 to my MacBook. Is there a simple way I am missing to do this? I have hundreds of RAW files and moving them individually would be laborious.
Thanks!
Hi Jonathan,
on your MacBook, you can find a little program called “Image Capture”; just connect your iPhone to your MacBook, open the program, sort by file type, and select all the DNG RAW files. This should be the easiest and quickest way to transfer all your RAW captures. Did that work for you?
Enjoy ProCamera
Hi,
Does the app take the photos in Raw format for the 0.5 (ultra wide angle) lens on iphone 11 pro max?
Thanks in advance!
Hi Elnaz,
it’s currently not possible to take photos in RAW file format with the ultra wide angle lens – that’s unfortunately an iOS limitation… However, RAW is available for the wide and the tele lens in ProCamera.
I use Pro Camera in an iPhone 5 SE, I’m thinking about getting the Vivid HDR. Does ProCamera take 1, 3 or how many shots for that? Can I download the unprocessed shots to my computer or the app processes them in the iPhone and the shots can not be downloaded?
Thank you
Ralph
Hi Ralph,
on an iPhone SE, the vividHDR mode captures 3 to 7 photos and automatically merges them into one final HDR photo. Before saving, you can select one or multiple presets to give your HDR image a certain look. Optionally, you can also save one LDR (non-HDR) standard photo along the HDR image.
In vividHDR mode it is not possible to save all the exposures used to create the HDR file – but we have a dedicated exposure bracketing mode just for that! The bracketing feature is part of our optional ProCamera Up subscription and it allows you to capture a series of photos based on your predefined exposure values. You can unlock this premium feature via Settings > Shop > Exposure Bracketing.
In this blog post, you can learn all about our bracketing feature: https://www.procamera-app.com/en/blog/raw-exposure-bracketing-in-procamera/