On August 21 2017, millions of people across the United States will be able to see a total eclipse of the Sun
The Moon will completely block the Sun and only the Sun’s corona will shimmer in the twilight sky. We already received some questions on how to capture this event with a smartphone. Therefore, we compiled this list with some general tips and thoughts.
This is the very first photograph of a solar eclipse, made by a Prussian photographer – or “daguerrotypist” to be more precise – named Berkowski in the year 1851!
(By Berkowski [Public domain], via Wikimedia Commons)
Why is it hard to photograph such a unique celestial event?
Many factors make it quite tricky to capture the eclipse in all its beauty. These are just a few:
- Eclipse photos shown on TV, the internet, or in books are taken with extremely expensive and highly specialized camera systems. Unfortunately, not many of us have some kind of private „observatory“ at home. This time, NASA even uses jet planes to chase and capture the Eclipse from the skies.
- A wide-angle lens, like it is found in all modern smartphones, doesn’t provide an ideal angle of view to capture a lot of details of the distant Sun or Moon. Both will be rendered relatively small.
- Other environmental factors not captured in a photo make this such a special event to witness. It’s the sudden drop of temperature or the reaction of animals around you that create an almost surreal impression.
- Shooting directly into the Sun’s corona means potential flares, extreme dynamic range, low light, and rapidly changing overall conditions. Quite a challenge!
- The whole phenomenon happens very rarely and only takes a couple of minutes, which is not a lot of room for trial and error.
But let’s not be discouraged by that! The last time a total eclipse was visible in the US mainland was in 1979. Take your chance.
Any tips on how to utilize the iPhone?
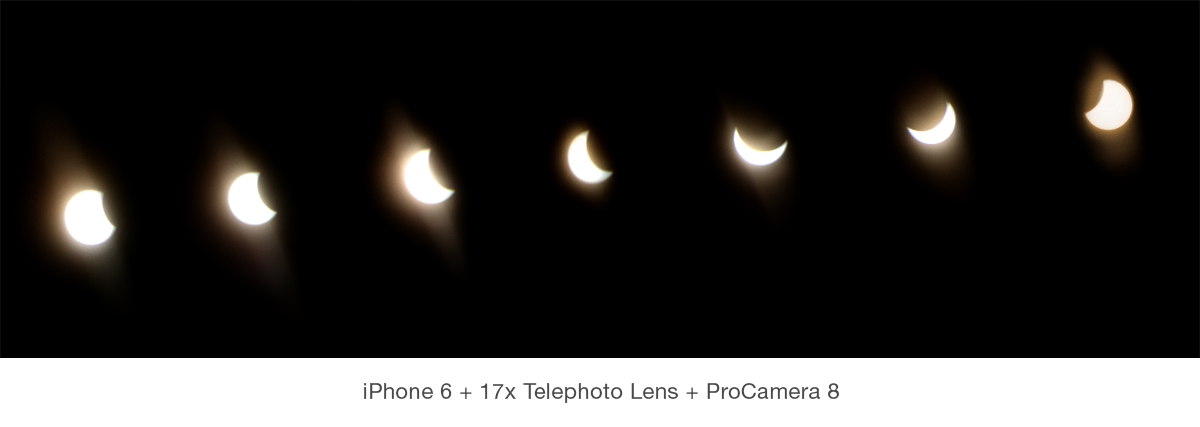
Two Years ago, we had the chance to photograph a partial eclipse with an iPhone 5 & iPhone 6 (and ProCamera 8) in Europe. Check our post from back then, to learn how we captured the image displayed above. Unfortunately, we can’t witness the US total eclipse this year, but this is what we have learned from our first try:
- Protection: This is a no brainer. Get one of those protective glasses. Don’t look at the sun without eye protection. Better get a bunch of them today, before they might be sold out in your area (happened to us…).
- Preparation: Search for a good lookout point the days before the eclipse and check the exact time of the eclipse for your area. Also check the weather for clear skies the the day or some hours before the event.
- Equipment: Think about what kind of equipment you are going to use. Tripod, external lenses, power bank, etc. And of course, check if ProCamera is installed on the device you are going to use 😉
- Filters: Most sources suggest using a filter to protect the camera sensor – we follow this recommendation. Better be safe than sorry… but since special filters can be really pricey, you can try and use a filter sheet of eclipse glasses. Alternatively, you can also get sheets of special protective film and cut filters out of that. Just tape it in front of the lens of the iPhone. Since all eclipse glasses were sold out in our area, we used several layers of space blanket (silver/gold foil), which also worked. To be on the safe side when using a filter in conjunction with an external lens, put the filter in front of the external lens, not in between the camera and the external lens. If things go wrong, the filter could potentially melt in between the camera and the external lens.
- Testing: Photographing the (full) moon is a good test run. You can get a feeling for all the potential challenges you can run into during the solar eclipse (camera shake, focusing, dynamic range, …)
- Features: ProCamera offers some very helpful tools for such tricky situations.
- Timelapse: You may use our ProTimer intervalometer feature to capture a series of photos that documents the event. The photos can be used to generate a time lapse video in a video editing software – or to create a photo compositing of the different stages in one image (see photo above).
- Manual Focus: The autofocus may have a hard time finding the right focus in these extreme conditions. Some external Tele lenses also make it harder to find the right focus. To activate Manual Focus, go to Settings > General Options: Focus and Exposure > Manual Focus: On. Activate “Show lens position” along with it, so you can check the general focusing distance. Even though the Moon and Sun are very far away from Earth, you should get the best overall sharpness when focusing some stops below the infinity symbol (mountain icon).
- Manual Settings: Play with the ISO and shutter speed setting. If you have a tripod, you can go ahead and dial in a longer shutter speed while lowering the ISO value, this will reduce the overall noise in the image. To go up to the maximum shutter speed of your device, switch to our complimentary LowLight mode. In the Control Panel (three line icon bottom right), you can select the longest value possible. For those longer shutter speeds, a tripod is highly recommended.
- LowLight Plus: This special camera mode (available as an In-App purchase) is great for shooting in dim light. During totality and/or when using strong filters, there won’t be a lot of light to record for the camera sensor. If you are using a tripod, tap the LUX+ button in LowLight Plus mode, to get that extra boost in brightness.
- iPhone 7 Plus: On this special device, you might test the Tele lens for a higher magnification of the Sun and Moon. Since the Tele lens has a smaller aperture, which means less light is hitting the sensor, this won’t work too well during totality. So be prepared to quickly switch back to the Wide lens when it’s too dim.
- Editing: To give your images some more punch, go to the editing section. Basic brightness, contrast, and exposure edits can already make a big difference. For advanced users, the curves tool is something to look at.
For more information, check out the video posting by WRCBtv. With all that said, enjoy this unique spectacle. It isn’t going to happen again any time soon. Maybe it’s even more interesting to take some photos of the people (or pets) around you during the eclipse. Everybody looks suuuper cool with those futuristic eclipse glasses 😀
Don’t just look at your camera, make sure to take a good look at the sky – with protective glasses, of course!


Where do I find the intervalometer?
Hello Joe,
– ProCamera’s intervalometer feature, which we call the ProTimer, is an extension of the already known Self-Timer. The ProTimer allows you to take a series of photos based on your custom parameters: Delay before the first photo is taken, total number of photos, and the pause between succeeding photos.
– To open the intervalometer, you first have to make sure that you have set the Self-Timer as your Second Shutter. The Second Shutter is the shutter button right next to the Main Shutter Button, which can either be assigned to the Anti-Shake feature or the Self-Timer. You assign the Second Shutter in the control panel (three line icon bottom right). Tap and hold the Second Shutter (Self-Timer icon) and then tap on “Open ProTimer” to get access to the intervalometer settings. By tapping on the Second Shutter, you start your photo series. The ProTimer icon generally tells you the number of photos set. After starting the photo series, you can stop the capture process at any time by tapping the Second Shutter icon – that comes in really handy when capturing an unpredictable scene, where you can’t be sure how long it will take. In such a case, it’s best to dial in a relatively high number of total photos and then stop the capture process once the scene is over.